Hardware
- Bend Sensor
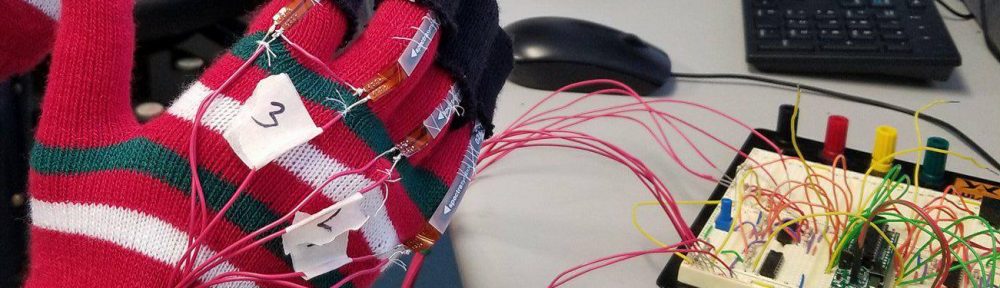
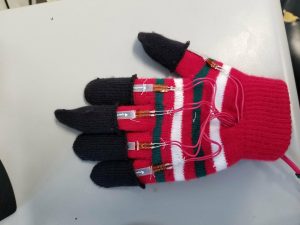
The flex sensor we used in this project was the SpectraSymbol Flex Sensor (Mouser Part #: 744-FS-L-0055-253-ST). This sensor is a variable resistor that we attached to a finger on our gloves and configured to output a high voltage (3.3 V) when the connected finger was bent, and a low voltage (0 V) when the finger was straight, which was then read into the PIC32 as a digital input. Based on the combination of bent/straight fingers, we could use our note decoder to decide which note the user was trying to play
- Pressure Sensor
The pressure sensor we used in this project was the Adafruit Square Force-Sensitive Resistor (FSR). This sensor is also a variable resistor, but as indicated in the name, this one is dependent of force applied. We used this sensor as a foot pedal for the user to indicate when he/she wanted to play a note. Just like the flex sensor, the pressure sensor was configured to output a high voltage (3.3 V) when the the sensor was pressed, and a low voltage (0 V) when the sensor was not pressed, which was then read into the PIC32 as a digital input.
Sensor URL: https://www.adafruit.com/product/1075
- LCD Screen
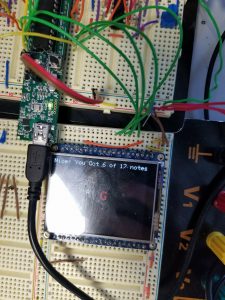
The display screen used in this project was the 2.2in LCD touchscreen configured for serial communication. This was used to show the user what note to play, whether or not they were playing the correct note, and their final score.
Part URL: https://www.adafruit.com/product/1480
- Comparator with Potentiometer
The setup used to convert the sensor values to digital input for the PIC32 was a comparator with a hysteresis window, controlled by a potentiometer. The comparator used was the MCP6004, as the LM324 didn’t go all the way to the rails.
- Digital to Analog Converter
In order to convert the digitial values from the sine table into analog values, we used the MCP4822 discrete DAC chip, configured for serial communication, as done in previously in lab.
- Headphone Jack / Speakers
The Output from the DAC was then sent to headphone jack connected to the speakers to output the analog value as sound. The speakers used were the Hytobi speakers previously provided in lab.
Software
The software was organized into three parts, a UI, a note file, and a finger decoder. Two proto-threads were used, one for recognizing the current finger positioning, and one to advance the UI at the correct speed. The finger decoder became pretty tricky, as the sensors were a bit finicky.
- UI
The user interface in this project is provided for the user to follow along to scrolling sheet music. The UI begins by telling the user the name of the song (only Hot Cross Buns currently) and then gives a countdown for the user. When the sheet music begins on the bottom of the screen, the current note is biggest, which the next note shown to the right is a smaller font, so that the user knows what note to play next. The current note is red if play the wrong note, and green if you play the correct note. Once the song is over, the users score appears at the top of the screen.
- Note File
A sine table was used to allow for Direct Digital Synthesis (DDS), as done previously in lab. Based on which note was being played, a corresponding accumulator amount was stored in the note file, and would advance through the sine table at the appropriate rate to produce the note.
- Finger Decoder
Functions were written to relate the digital inputs to the PIC32 from the flex and pressure sensors. Based on which pin each finger was read into, a corresponding digital value was associated. For example, the finger attached to RB6 had a digital value of 64, 26, or in binary, a 1 in the 6th position. So when we bitwise or the value of all the inputs, we get one value that we can relate to a note.
In our original design, we had planned on using an SD card to play notes from a saxophone, so it would sound like an actual sax. We originally thought this would not be overly difficult, but quickly realized that SD cards have many intricacies to them. In 2015, a team used an SD card to store songs for a fingerprint doorbell, which we thought would be a very helpful resource for learning how to read from a SD card. Even though their documentation was well written and very informational, we were unable to get the SD card reader to work 100% of the time as we would expect it to. We were able to play notes from the SD card, but they usually were not the one we intended and would not loop as we wanted them to. Due to this inconsistency, we ultimately decided to ditch the SD card reader and use direct digital synthesis.