Amtrak, B-Movies, Web Development, and other nonsense

Month: February 2017

The Toledo Option

Or, I reconsider the Lake Shore Limited yet again, and find a use for it.

A frequent complaint about Amtrak service is that “you can’t get there from here,” and it’s a fair criticism. As a Michigan expatriate living on the East Coast I’m sensitive to these limitations. Michigan itself has comparatively good service: three Wolverines to Detroit/Pontiac, the Blue Water to Lansing and Port Huron, and the Pere Marquette to Grand Rapids. Unfortunately for me all three services pivot on Chicago. Coming from the East Coast, I’m facing hours of layovers and backtracking.

As an alternative, Amtrak offers a Thruway Motorcoach connection at Toledo to various destinations in Michigan. Thruway Motorcoachs are contracted buses which you can book with trains to help get you closer to your final destination. I’d resisted this option for years because of the timings in Toledo and general uncertainty about the whole enterprise. After a positive experience with an Amtrak bus in Florida in 2014 and a growing desire to avoid driving on I-80, I decided to take the plunge.

The trains

The Lake Shore Limited at Croton-Harmon. Photo taken by Adam E. Moreira, [CC BY-SA 3.0 (http://creativecommons.org/licenses/by-sa/3.0)], via Wikimedia Commons

The Lake Shore Limited at Croton-Harmon. Photo taken by Adam E. Moreira, [CC BY-SA 3.0], via Wikimedia Commons

Amtrak has two trains serving Toledo, the Capitol Limited and the Lake Shore Limited. They are both long-distance trains running between Chicago and the East Coast; neither serves Toledo in daylight. The Capitol Limited runs southeast to Pittsburgh and Washington, D.C.; the Lake Shore Limited follows Lake Erie and serves New York City by way of Buffalo and Albany. I’ve previously written several posts about the Lake Shore Limited but I do not come here to bury it (again).

The bus

Amtrak contracts with local bus operators to provide bus connections. Trinity Transportation handles the bus from Toledo. Westbound, the bus is scheduled to depart Toledo at 6:30 AM, or thirty minutes after the scheduled arrival of the Lake Shore Limited and ninety minutes after the Capitol Limited. It will be held, barring major disruptions, for both trains. Eastbound, the bus arrives in Toledo at 10:35 PM, or an hour before the scheduled departure of the Capitol Limited and four hours before the Lake Shore Limited.

The bus itself is of the modern intercity variety, with comfortable seats, a restroom, and free Wi-Fi. When I rode the bus it was close to full between Toledo and Detroit but half the people got on (or off) in Detroit.

The station

The platforms at Toledo, OH. Photo by Prasenberg.

The platforms at Toledo, OH. Photo by Prasenberg.

Toledo is an intermodal facility, serving Amtrak, intercity buses, and local buses. It’s expanded from a New York Central Railroad station built in the 1950s. The station is open during the wee hours of the morning when Amtrak’s long-distance trains come through. It’s well-lit and there are comfortable chairs to sit on. Amenities include restrooms, Pepsi machines, a snack machine, a coffee vending machine. There’s also a small Subway sandwich shop which is open until midnight.

Where you can go

The bus serves five destinations in Michigan:

  • Detroit: the Amtrak station in the New Center neighborhood near Wayne State University.
  • Dearborn: the new Amtrak and intermodal station.
  • Ann Arbor: the Amtrak station along the river.
  • Jackson: the Amtrak station in downtown Jackson.
  • East Lansing: the new Amtrak and intermodal station off Troubridge.

I’ve done Ann Arbor and East Lansing; in both cases I needed to rent a car to complete my journey. There isn’t a car rental location near either station. In Ann Arbor there were taxis at the station; in East Lansing I needed to call one. The East Lansing station closes at 6 PM, an hour before the scheduled departure of the bus, but there’s an enclosed waiting area which stays open and which has not-entirely-uncomfortable seating.

Game planning

This is the itinerary I employed over the Christmas holidays:

Outbound

  • 3:40 PM (Day 1): Depart New York on the Lake Shore Limited
  • 5:55 AM (Day 2): Arrive in Toledo
  • 6:30 AM: Depart Toledo on the bus
  • 10:05 AM: Arrive in East Lansing

Inbound

  • 7:00 PM (Day 1): Depart East Lansing on the bus
  • 10:35 PM: Arrive in Toledo
  • 11:49 PM: Depart Toledo on the Capitol Limited
  • 1:05 PM (Day 2): Arrive in Washington, D.C.
  • 3:05 PM: Depart Washington, D.C. on the Northeast Regional
  • 6:30 PM: Arrive in New York

The choice of the Capitol Limited on the return eliminates an extra three hours layover in Toledo while not materially altering the arrival time in New York. Another option is to change to the Pennsylvanian in Pittsburgh but that makes for an early morning after a late night.

The big consideration here is meals. Unless the Lake Shore Limited is very late you’re missing breakfast westbound, and you’re definitely missing dinner eastbound. Assuming a big dinner the night before, missing breakfast is tolerable, but I suggest bringing along some granola bars or some such. Eastbound, the Subway at the Toledo station is a godsend.

Alternatives

A big theme in my travel writing and planning is resiliency: I want above all to maximize my options while controlling costs. I considered bypassing Toledo and the bus altogether in favor of South Bend, Indiana. South Bend is roughly the same driving distance from the places I would drive to in Michigan. With South Bend I had to weigh the following considerations:

  1. South Bend is 2 1/2 hours west of Toledo. Westbound that’s more time to sleep and gets you breakfast on board, but also adds that to your final ETA. Eastbound you still miss dinner and have to meet the train that much earlier.
  2. How do rental car prices at South Bend compare to the rental car prices in Michigan? What are the hours of the facility?
  3. How is taxi service in South Bend? How does Uber/Lyft availability compare to Ann Arbor or Lansing?
  4. If I encounter problems in South Bend, what are my fallback options? Is there a bus? Do I know someone who can pick me up?

These same factors applied to all the Michigan locations. I selected East Lansing because of rental car price, timing, and proximity to my final destination.

The verdict

This works as a travel option between the East Coast and mid-Michigan. Door to door it takes about the same amount of time as driving the whole way with an overnight stay, and can be price-competitive under the right conditions. It also eliminates someone sitting behind the wheel for 630 miles, and that has to be worth something.

Hammering Cases

Last December I went down to Philadelphia for WordCamp US 2016. Met some great people, heard some great talks, overall had a good time. Holding the after party at the Academy of Natural Sciences was a genius move.

Sitting at Lisa Yoder’s talk on Version Control Your Life: Alternate Uses For Git inspired me to try taking notes in Markdown (versioned in git) instead of Evernote. I’m trying to move away from Evernote anyway and it made perfect sense. I’m always working on the command line; I always have Typora open as scratch-space.

I ran into an immediate (and silly) snag. All the WCUS sessions are titled “This Is The Name Of My Awesome Talk”. That’s a bad filename if you’re working on the command line. Ideally I want my notes on that talk to be called “this-is-the-name-of-my-awesome-talk.md”. Manually typing all that is boring, and I’m lazy. Better way? Better way.

Hammering markdown

Separately, I’d been playing around with Hammerspoon the last few days. Hammerpsoon is an automation engine for OS X. You can write Lua modules to perform various tasks, triggered by system events or manual invocation. It seemed cool and all, but I hadn’t found a concrete use case. Sitting in that talk, I had an idea—use Hammerspoon to convert arbitrary text (like a talk title) to an URL slug, which I could then use as a filename.

The actual module is pretty short; 38 lines including comments. Aside from some Wikipedia modules I don’t really have exposure to Lua, and Hammerspoon itself was terra incognita. Let’s step through this:

hs.hotkey.bind({"cmd", "alt", "ctrl"}, "T", function()

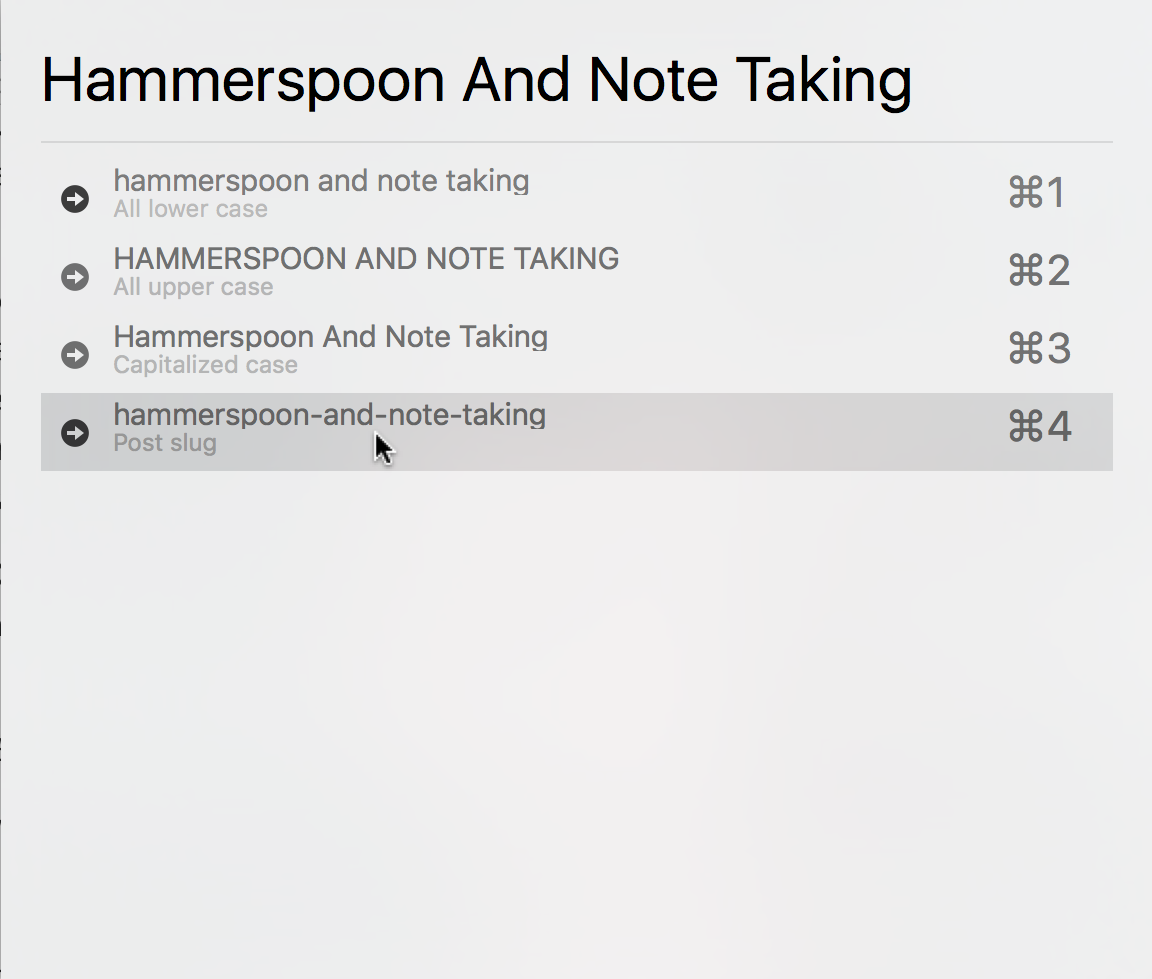
hs is the primary Hammerspoon object. I’m binding ⌃⌥⌘T; pressing that combination will activate the code within the module.

    local current = hs.application.frontmostApplication()

Brings the application forward so that we can send events to it.

    local chooser = hs.chooser.new(function(chosen)
        current:activate()
        hs.pasteboard.setContents(chosen.text)
    end)

Creates a chooser window and tells it to send the result of that window to the system clipboard. Now, here’s the actual callback:

    chooser:queryChangedCallback(function(string)
        local choices = {
            {
                ["text"] = string:lower(string),
                ["subText"] = "All lower case"
            },
            {
                ["text"] = string:upper(string),
                ["subText"] = "All upper case"
            },
            {
                ["text"] = string.gsub(" "..string, "%W%l", string.upper):sub(2),
                ["subText"] = "Capitalized case"
            },
            {
                ["text"] = string.gsub(string.gsub(string:lower(string),"[^ A-Za-z0-9]",""),"[ ]+","-"),
                ["subText"] = "Post slug"
            }
        }
        chooser:choices(choices)
    end)

This is where we actually create the chooser window and populate it with options. This is mostly string math. Hat tip to n1xx1 on stackoverflow for the capitalized case logic and Draco Blue for the post slug.

We’re almost done!

    chooser:searchSubText(false)

Tell the chooser to not search the sub text. Frankly I’m not sure what it does, but I saw it done in another module.

    chooser:show()

Finally, display the chooser window.

Putting it all together

With the module installed, I’m a keyboard combination and a copy-paste sequence away from a post-friendly slug for any bit of arbitrary text:

I finished up the module during the second round of talks. At the time I was half-worried that the project violated the XKCD rule, but I’ve found myself using it more and more over the last few months. Beyond note-taking, it works well for storing electronic articles and books. Besides, I had a good time doing it and learned something new.

What I’m reading

  • John le CarréThe Secret Pilgrim. A semi-sequel to The Russia House, consisting of the reminisces of Ned at the end of his career. Fascinating and absorbing.
  • John R. SchindlerFall of the Double Eagle: The Battle for Galicia and the Demise of Austria-Hungary. An account of the Battle of Galicia, the opening collision between Russia and Austria-Hungary in World War I. It’s always refreshing to read an account of Austria-Hungary which doesn’t place it in the shadow of the German Empire. I’m familiar with the subject but Schindler’s treatment of the ethnic issues in the military is fresh.
  • Tim HadleyMilitary Diplomacy in the Dual Alliance: German Military Attaché Reporting from Vienna, 1879–1914. I heard Hadley give a talk on this subject at the German Studies Association conference in Pittsburgh way back in 2006. The premise is that there was a disconnect between the reporting of German military attachés in Vienna and German strategic planning. This book is the outgrowth of that talk, and I can’t wait to read it.

Nextcloud on Pi

Following on with running Plex on a Raspberry Pi, I decided to play around with Nextcloud. This is very much a work in progress, with all my failures and blind alleys lovingly detailed. Note: some guides refer to both ownCloud and Nextcloud almost interchangeably. Nextcloud is a fork of ownCloud; technologically they’re very close. The Nextcloud desktop client is a themed fork of ownCloud’s and they’re compatible with the other’s servers.

Web application

At its core Nextcloud is a PHP application; setting those up isn’t complicated and there’s a good guide for doing so on a Raspberry Pi. I broke with it and opted for PHP 7 over for performance reasons. I used part of Andy Miller’s guide for that (ignoring the Nginx stuff) but I found I needed more PHP modules:

sudo apt-get install -t stretch php7.0 php7.0-gd php7.0-sqlite3 php7.0-curl php7.0-opcache php7.0-zip php7.0-xml php7.0-mbstring

Data storage

I went down a number of blind alleys with the backend. If you’re planning to have the bulk of your storage live external to the Pi you shoud still keep Nextcloud’s data directory local. The first thing I tried doing was simply putting it on an NFS share as I’d done with Plex. This was a bad idea and didn’t work. Nextcloud supports a concept of external storage; users can choose to add Samba shares, Google Drive folders, etc. That’s the proper way to attack the issue.

I tried Samba/CIFS first. Mounting a share from the Synology NAS worked fine but after a successful initial sync I encountered an error in which I was notified every couple minutes about remote changes and prompted to resolve them, although no such changes had taken place. I ensured that the clocks were synced between my laptop, the Pi, and the NAS, but didn’t solve it. I think the root cause is this issue in the ownCloud client; it’s solved in master but not in a compiled release. I encountered environment problems trying to compile the client and decided to try a different method.

Happily, I encountered no problems setting up WebDAV. As with NFS, you do have to enable it on the Synology NAS, but once you’ve done that you can just add it as external storage. I found that I needed to re-do the sync with the client after changing external storage methods, even though they had the same directory structure. I’m still getting some spurious notifications from the Nextcloud client but they’re infrequent, don’t require action, and don’t steal focus.

External access

I did all this as a proof-of-concept with HTTP access only and a local IP. To make this truly useful you need to be able to access your files from offsite. To make that practical and secure you need a domain name and an SSL certificate.

I registered a domain from hover; a friend recommended them and they seemed reasonably priced. I pointed an A-record at my current IP, which is somewhat static. I didn’t bother with any dynamic DNS solutions; I can accept the 24 hours it takes for the record to propagate when my IP eventually changes.

The Pi is behind two NATs: my cable modem and my wireless router. As with Plex I set 443 to forward from the outside world to the Pi. I think port 80 is blocked by my provider and I’m not offering anything on 80 anyway.

For the SSL certificate I went with Let’s Encrypt. I’ve used them with other small projects. The instructions for Certbot on Debian 8 (jessie) mostly worked; I found that I needed to import two repository keys. Once I did that I was able to run Certbot which handled all the SSL configuration on the host.

Cleaning up

With an HTTPS-fronted domain live I added that domain to the list of trusted domains on the server, then swapped out the client configuration on my laptop. Nextcloud appeared to recognize that it was dealing with the same server and didn’t need re-sync anything.

I’ve been running in this configuration for close to a week and it’s been smooth sailing.

Featured image by fir0002 | flagstaffotos.com.au [GFDL 1.2], via Wikimedia Commons

Raspberry Plex

I’ve been running Plex on a Synology NAS for the last year, with a Google Chromecast handling display. It’s worked well enough, but my DS 216 struggles at times to keep up with the movie (I’m not transcoding; that would never work). I decided to get into the Raspberry Pi game and build a Plex server on it, while keeping my media on the NAS. These are my notes on setup.

Image

I’m comfortable in Debian so I started with a stock Raspbian image on a 32 GB SD card. I used Etcher on OSX for this and didn’t encounter problems. I’d say it took 8-10 minutes.

Keyboard

Raspberry Pi’s come with the keyboard set to the UK, which works for most things but can trip you up. I changed it to Generic 105-key PC and selected a US keyboard layout.

DHCP

I created a reservation on my router for the Pi’s hardware address so that the IP would be consistent. The procedure for doing so will vary depending on your home networking environment. You’ll need to know the hardware address of the interface you’re using (wired or wireless).

I opted for the wired interface. As an additional step, I changed the configuration in /etc/network/interfaces from iface eth0 inet manual to iface eth0 inet dhcp. This is a little misleading; the interface still gets an IP address via DHCP when set to manual, but it happens later in the boot process. This causes problems with mouting an NFS share.

SSH

SSH access is disabled by default; I enabled it and setup key-based authentication as an extra security measure. You can disable password authentication by setting PasswordAuthentication to no in /etc/ssh/sshd_config and restarting ssh.

NFS

That was all preliminaries for the interesting part—making my existing media libraries available to the Pi. On my Synology NAS I enabled NFS as a service and then enabled NFS sharing for my media library.

On the Pi I installed and enabled the rpcbind service:

pi@raspberrypi:/mnt $ sudo update-rc.d rpcbind enable
pi@raspberrypi:/mnt $ sudo service rpcbind restart

I then created a mount point for the media:

sudo mkdir /mnt/media
chown pi:pi /mnt/media
Finally, I added an entry for this mount in /etc/fstab and mounted it:
{IP ADDRESS}:/volume1/Media /mnt/media nfs rw 0 0
sudo mount -a

Plex

Much of the foregoing is based on the excellent tutorial on installing Plex on a Pi from element14. At this point I’m ready to install the various packages:

sudo apt-get install apt-transport-https -y --force-yes
wget -O - https://dev2day.de/pms/dev2day-pms.gpg.key  | sudo apt-key add -
echo "deb https://dev2day.de/pms/ jessie main" | sudo tee /etc/apt/sources.list.d/pms.list
sudo apt-get update
sudo apt-get install -t jessie plexmediaserver -y

I rebooted the Pi and was good to go.

Issues

These aren’t specific to the Pi but just things I encountered.

  • I had created down-scaled “versions” of some of my media for playback purposes. The new Plex found these, but they got commingled with the actual media leading to Plex detecting the wrong audio type (e.g. AAC instead of DTS). The Chromecast refused to play said media. I resolved it by deleting the “versions”, re-matching the media in question, and re-creating the version.
  • I’d forgotten that my setup is a “Double NAT“; to allow remote access I had to pass traffic from my cable modem to my internal router and then on to the Pi.

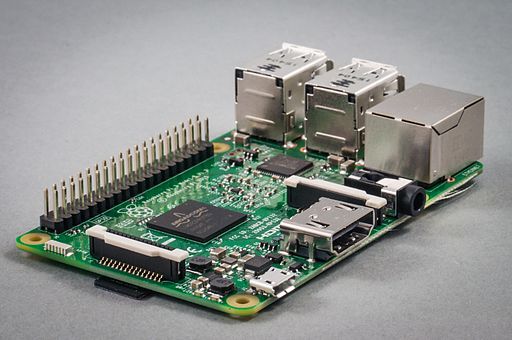
Featured image by Sven.petersen (Own work) [CC BY-SA 4.0], via Wikimedia Commons.