Irrigation System
Overview
Figure 14: Current irrigation system
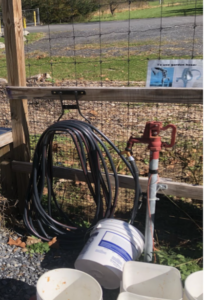
Image shows the only current spigot on Hackett Farm. Currently the hose and filling watering cans are the only ways water reaches other areas of the farm
Our third project is the irrigation system. The current water supply consists of a singular spigot where hoses and other attachments can be connected. This supplies the entire farm and it is quite inefficient. To make the farm run at a higher production rate, while lowering labor inputs a second spigot must be added. There are a few easy ways to add another spigot, but the easiest and most cost effective is to split a waterline off of the existing waterline feeding the first spigot and run an additional line off of it to the new desired location where a new spigot head can be installed.
Additional Spigot
The first step to installing the second spigot is to go to the first one and dig it up until the waterline itself is exposed. The normal material used for these types of water lines is PVC pipe. When the PVC is exposed there will be a 90 degree bend, commonly referred to as a 90 degree fitting. The pipe flowing into the fitting would need to be cut using a hand saw or an electric saw immediately before the pipe reaches the fitting. Then the entire spigot and vertical piece of the waterline can be pulled above ground. The 90 degree fitting will also have to be cut off of the vertical piece of the waterline. When the fitting has been removed from both ends, then the surface of the pipes can be cleaned and prepped. One they are cleaned PVC primer and glue will be used to put a new fitting in the same exact spot as before. The only difference with this fitting is that it has 3 ends to it instead of 2. It lets pipes be connected at 90 and 180 degrees instead of just 90. It is commonly referred to as a T or tee fitting in plumbing. This allows for another waterline to be run to a new location. When the new fitting is put into place, then a trench must be dug all the way to the area where the new spigot is being placed. Then pvc pipe and fittings can be used as needed to run the waterline over to the new area. Then a 90 degree fitting will be placed at the desired location and the new spigot can be attached. Splitting the spigots this way could cause a loss of pressure if both are turned on at the same time because of the nature of the splitting of the waterline. However, there is no concern of lowering the pressure since it has been reported that the existing spigot has a very high pressure for the tasks it will be used for. Also when installing the new lines it is very important that they are dug below the frost line to prevent the water lines from freezing and then cracking. The spigot we have chosen to use has an extra 4 feet of vertical piping on the bottom to accommodate the depth needed to keep the water from freezing and cracking the lines.
The addition of a spigot could be completed in as little as a couple of hours up to about a full day depending on the amount of workers provided and if the trench for the waterline is dug with a machine or by hand. This is a common addition to many small scale farms and even personal gardens and there are many articles and instructions that are designed for a singular person with little experience in plumbing such as this one. The only difference is the large distance between the existing spigot and the new one, but this does not really change how it is installed, it just means that it will require a longer trench and more pvc piping. The material cost would be minimal for a farm of this size and production rate. The material cost for this job is $110.42 and the full material list is shown below. This upgrade will pay for itself in a very short time because of how much time is saved when watering the vegetables and the daily work and maintenance of the farm will be more time efficient as well, allowing for the farms production to be increased and allowing Ms. Wicha to still distribute her time among the six community gardens as she sees appropriate.
The labor is straightforward and could easily be completed by city employees. The addition of the second spigot eliminates the conflict between Ms. Wilcha and the community gardeners trying to use the same water source. It also makes the use of drip tape much easier. The spigot would be placed near the inground beds and drip tape would be run along those beds so that Ms. Wilcha does not have to water the beds manually with a watering can.
Drip Tape
Figure 15: Drip tape
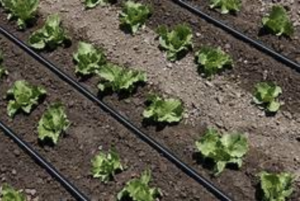
Image shows what the proposed drip tape would look like in the in-ground beds
Drip tape is essentially hoses buried in the ground that have holes in them. When the water supply is turned on it supplies water directly to the roots. This is very important because almost no water is lost due to evaporation, and the water can be absorbed by the roots in a much faster manner. This irrigation method is very beneficial to the plants but it is also very beneficial to the farmer because she can simply turn the spigot on and come back to turn it off after a sufficient amount of time has passed. This may vary depending on the time of year or the types of plants that are growing there at the time. This method is also known as one of the best irrigation systems for a small scale farm or garden. It reduces damage and disease that can harm the plant and fertilizer can also be run through the water lines and mixed with the water, making the care taking of the crops even easier. This can be done by having a nipple and valve on the hose of the drip take that allows a container full of fertilizer or other nutrients to be connected to the hose. Then the contents are slowly released into the water where it mixes in. The only part of this process that requires labor is filling up the container otherwise it is completely automatic. The installation would most likely be done by Ms. Wilcha because it is not very labor intensive and she has prior knowledge on the topic and may have certain preferences on the placement of the tape and the fittings. There are many benefits and easy installation instructions included in this article. The cost can vary depending on the brands and fittings that you choose, but the most user-friendly way is to buy it as a complete kit. The kit that we chose is capable of irrigating 1000ft of crops (linear) and up to 15 rows of crops. The ground beds at hackett farm could reach up to 10 rows and 800-900 feet so this is plenty of material to work with. Also buying the kit assures that all of the parts will fit together and that enough of each part and fitting is included. Also, this can lower the price because of the larger amount of the products sold. The cost analysis is quite simple for the drip tape since the material comes in a kit and the Labor would be done by Ms. Wilcha and possibly volunteers. The only monetary cost is $246.37 for the kit.
Overall the irrigation system upgrades would be beneficial to not only the people who need to use the water but to the plants as well. This system would make taking care of the garden much more time efficient and less labor intensive. It does not produce these benefits at the expense of the health of the garden either, if anything this system is healthier and more effective for the plants as well. The only cost would be the money it would take to make these changes, which is quite small considering how large the benefits would be. These changes to infrastructure are not major and could be completed by the city or eastons workers in less than one day.
The cost estimate of the proposed drip tape irrigation system and additional spigots is largely influenced by the city of Easton since the water lines are owned by the city. Assuming that the city would be doing the labor and that the material is what we suspect, the material list can still be completed. For this part of the project we are assuming that 3/4 inch pvc piping was used when the first spigot was installed. If the material changes then the fittings and the other Items will remain the same the price will just have to be adjusted. The tools needed would be a saw, a measuring tape, and something to dig the trench with, preferably a mini backhoe. The likelihood that the city has these tools is extremely high, which would save even more money.
Cost Estimation
Table 5: Irrigation Cost Estimation
| Item | Quantity | Cost x Quantity = Total Cost |
| 90 degree fittings | 3 | 1.41×3 = $4.23 |
| T fitting | 1 | $1.72 |
| Pipe | 40 ft | $32.48 |
| Glue and Primer | 1 | $12.34 |
| Spigot | 1 | $71.85 |
| Total | $122.62 |
This cost analysis is based off of current home depot prices since supply houses change prices and include bulk discounts as well as pricing that is consistent nationwide. Sometimes they also do not reveal prices until the customer places the order. Also large nationwide companies keep almost all products in stock and they receive the majority of the suppliers products due to the fact that they are extremely large. This means that the suppliers have an incentive to keep Home Depot satisfied and keep the cost per unit as low as possible. However the city of Easton may use a different supplier and may have connections with them, but pricing would only be lower than the cost analysis that was conducted. The cost of the entire Irrigation system would then come out to $368.99 (adding both the new spigot and the drip tape).
Click here to go to our Final Plan breakdown.