How to Build a Battle Robot:
This is a rough outline on how to build a 12-30 Lb. battle robot created using our knowledge in hopes to make the process easier for others. Our battle robot only competed in 1 event with minimal success, however, along our journey we have learned a great deal but there is still much more we do not know. Note that this is not a linear design process in that this journey will require revisiting previous steps in order and constant improvements.
- Decide on what size robot that you will be creating and find a competition about 6-12 months away what you will be competing in.
- Common weight classes are 12 – 30 pounds. The 30-pound weight class will likely be primarily college teams and professionals with smaller weight classes containing more amateur teams.
- The cost of the robot will not be entirely determined by the weight class but rather the complexity of the robot.
- Our budget was approximately $3,000 not including the cost of manufacturing components.
- Discounts are available though manufacturing companies that have partnerships with specific competition venues. Contact your competition to see if this is available.
- Familiarize yourself will common robot Design.
- Watch past competitions in your weight class and take not of what works and what doesn’t work.
- “An unconventional robot will prove why we have conventions”
- Begin preliminary design stages using whiteboards and scratch paper.
- Things to consider in design:
- Number of wheels and mobility.
- The mobility of the bot is more important than the weapon.
- Traction is important and ground clearance.
- The weapon types
- Common examples: Vertical and horizontal spinners, hammer, Wedge, and lifters.
- Chassis shape and ability to flip over.
- Make sure to leave ample room for motor controllers and batteries.
- A chassis that is easy to work on is important as well as the ability to swap out components.
- Utilize a strong subframe with plating armor that is preferably steel.
- Once a rough design is chosen start the initial design stage. Throughout this process remember that your design choices are by no means final and are highly subject to change.
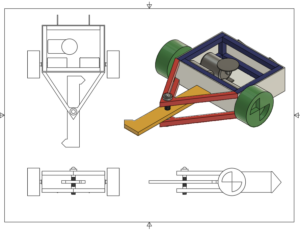
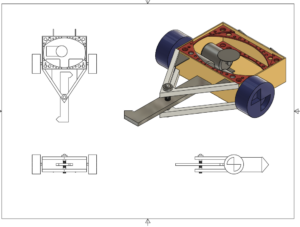
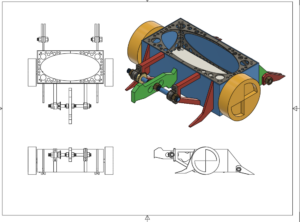
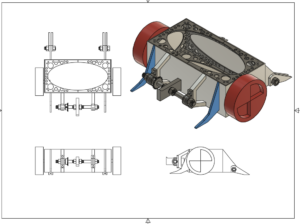
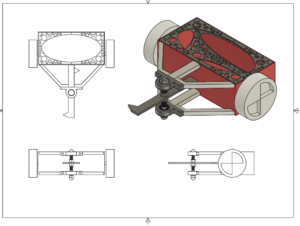
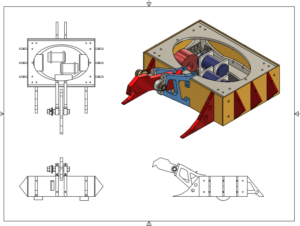
- Create rough cad models and get a sense of the size that you will be working with. Focus on the chassis shape and weapon location.
- Once you complete your first initial design in CAD start over and make a new one. Repeat this step until you no longer see any need for improvement. Given the opportunity if we were to compete again it would be best for us to consider a complete design of the chassis.
- Methods of testing the design may be:
- 3d printing scaled sown models
- Conducing finite element analysis on components and assemblies.
- Creating cardboard models for scale.
- Conducting a weight assessment.
- For a 30-pound robot the spinner should be 5-10 pounds.
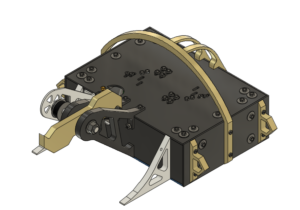
- Here is our design progression:
 Mobility:
-
- For the mobility you want to have complete and accurate control of the robot.
The robot should utilize a great box similar to a RC car.
- The traction of the wheels is important and crucial for wood floor arenas.
- The robot needs adequate grounds clearance in order to avoid obstacles and debris.
- The motors should be mounted with both a front and rear mounting plate.
- If this isn’t possible due to rotating housing mount the motor shaft on a bearing.
-
- Methods of testing the design may be:
- Number of wheels and mobility.
- Watch past competitions in your weight class and take not of what works and what doesn’t work.
- Weapon system:
- Spinners deal the most damage and are highly effective.
- Made sure to over engineer spinner shafts and pulleys.
- A good weapon should also be a good defense.
- Use a large motor for the spinner and test the rpms.
- For testing purposes, a circular spinner with the same mass and moment of inertia to test safely.
- Spinners deal the most damage and are highly effective.
- Armor:
- For 30-pound category utilize 1/8 in steel plates in conjunction with a strong subframe.
- The armer should have several bolts attaching it that are counter sunk so the external of the robot is smooth.
- Preparing for competition:
- Bring extra parts.
- Assume that any and everything can break.
- Bring lots of tools.
- If you are not adequately prepared to compete and confident in your robot.
- Have fun with the competition since you will be against people with many years of experience and battle-hardened robots.
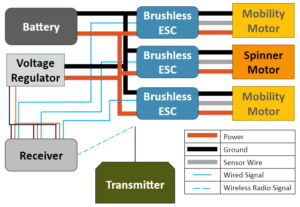
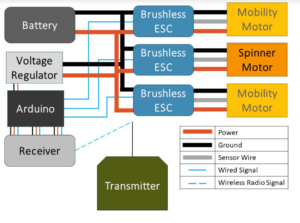
- Electronics:
- Your options: No Arduino OR Arduino
- Your options: No Arduino OR Arduino
- Arduino:
- The choice of layout of including an Arduino or not is a big choice. Arduino will not be easy to include even if you have good knowledge of Arduino. After taking many courses with Arduino, we still found the Arduino to be inconsistent with the ESCs we chose. Radio Fail-Safe, and programming was not easy. You also cannot use the “AnalogWrite” or “AnalogRead” command to read these signals as the signals are faster than PWM Arduino signals. You would likely need to use a library, or create one.
- However, if you choose not to use an Arduino, your transmitter programming could be less than ideal. If you chose to not use an Arduino, which we would recommend, try finding a transmitter that has two sticks that have the ability to be springed to the center.
- Battery:
- We recommend a LiPo (Lithium Polymer) battery
- You will find that batteries are not rated for Voltage and Amperage, but rather cells and discharge rating:
- 1. Voltage: approximately 5S voltage (5S = 5 cells where 1 cell is approximately 3.7V)
- Note that the voltage S rating for your battery must also match the voltage rating for the ESCs and motors
- 4S or 6S might also be advantageous as this will be most likely more compatible with more motors
- 2. Amperage Discharge Rate: We used a amperage discharge rate of 4000mAh
- This value depend on how much power you are taking from the motors and how many. With 3 motors and 3 minutes, this is really a good amount and doesn’t more. We never really had to charge our battery much even with testing
- 1. Voltage: approximately 5S voltage (5S = 5 cells where 1 cell is approximately 3.7V)
- Motors:
- There are two main types of motors: brushed motors and brushless motors. The difference can be seen by the number of wires coming out of the motor: 3 wires = brushless motor, 2 wires = brushed motor. Some research is required to figure out which is best for you, but we recommend brushless motors for their rpm capabilities, power output, abundance of options, and their compatibility with many ESCs.
- There is three main numbers for motors:
- 1. Voltage: usually in cells amount and usually a range of values. We chose a motor with a range of 2S-6S.
- 2. Amperage: This number gives you a voltage that should be given to the motor from the ESC. We chose a value of 70A-80A.
- 3. kV rating: Note: this DOES NOT mean kilo-Volt rating!!! This describes the RPM a motor does per volt put into it. We chose a value of 650kV for our spinner and 1100kV for our mobility.
- This number is comparable to efficiency, but without a load attached. So careful not to get a too high RPM motor as then there is small torque.
- ESCs:
- We originally chose the DYS Aria 70A Blheli_32 ESC, but when this took ~3 months to ship (when it said it would take 7 days), we could not use this and fell behind fast. We then chose the HobbyKing X-Car Beast Series ESC for its fast shipping. Careful of this. If a company doesn’t have a phone number, be skeptical. We were pretty confident this DYS Aria 70A Blheli_32 ESC would come in as Lehigh used this ESC, but it did not, unfortunately. However:
- There are 2 main numbers to follow for choosing ESCs:
- 1. Amperage Rating: since our motors were rated for 70-80A, we needed something close to there. We got an ESC that had a 120A rating: a little high, but it was the only thing we could get our hands on.
- 2. Shipping: I know this one seems like not a real value, but this was the one part that was hard to get in time. Be sure to just order SOME ESC early. VERY early. This will be important.
- HUGE NOTE: Some ESCs are not reversable. Most plane/drone ESCs are NOT reversable. This means, car no go backwards. So! Be careful! The easiest way to remedy this is to only look into ESCs that are for RC Cars and of that sort. Or look at the Spec sheet to find that information.
- Another Note: Some ESCs come with built in buck convertors (voltage regulators). This can be used to power your arduino, and/or be plugged directly into your receiver. This means that buck convertors are optional (not needed in our case). Usually not needed.
- Transmitters and Receivers:
- The metrics to choose a transmitter and receiver is the number of channels and if it is SBUS or not. I would see the transmitter and receiver selection section of the website: it goes in depth on why we chose the transmitter we chose.